Sunday, June 24, 2012

Summer of Color - Baseball Nut

Over at Kristin's blog Twinkle Twinkle it's Week 3 of Summer of Color, and this week's ice cream inspiration is Baseball Nut:


Creamy vanilla with a black rasberry swirl and cashews. Yummmm - this challenge has not been easy on my diet.   When I thought about the color of black rasberries, I thought about flowers, and Spring, and birds. (Maybe because now that the weather is so hot here, I'm longing to go back to Spring!)


I had to add green - I couldn't do flowers without leaves! And I added some glitter, I like the contrast of the silky fabric and glitter with the old page and the rusty leaves.... 


Wednesday, June 20, 2012

Mint Chocolate Chip - Summer of Color


This weeks Summer of Color ice cream inspiration over at Kristin's blog is mint chocolate chip.  Yummm....  I'm loving the sheer variety and creativity I'm getting to see as I look through everyone's blogs for these challenges.  I had no idea where I was going when I sat down to start this piece, but somehow I ended up with this.


On wood, with old papers, old handmade lace, wax, a frozen Charlotte, and misc bits and pieces.

Wednesday, June 13, 2012

Summer Of Color!


I have an admission - I've never participated in a weekly challenge before (much less daily) - I'm always worried about overcommitting myself what with the day job and all, and finding myself not actually enjoying what I'm doing.  But I can't resist Kristin's Summer of Color challenge - it's laid back, no pressure, a great group of participants, and most of all run by Kristin, who I just love. Well, okay another motivator is that every week's theme is a flavor of Ice Cream - by far my BIGGEST weakness, among many.


The first weeks ice cream inspiration is Rainbow Sherbet....Yummm....


As I thought about it, the idea of a Rainbow Sherbet rainbow popped into my head, and there was no going back.  This kind of sweet, childlike piece is not something I would probably normally make (mostly because my nieces and nephews are all too old now, so I'm not as inspired as I used to be) but I think that's what's good about a challenge like this -  it leads you to go outside your usual comfort zone and do something different.  And I really enjoyed it....(In spite of the dry time!)


I'm doing a p.s. and adding to this post - I was planning to talk a little about how I made this when I made the original post, then things got crazy on me at work and I just hit "publish".  So now, since a few people have asked - my secret ingredient for the clouds was a pre-mixed little tub of drywall repair compound.  I spread it all over a 6"x12" piece of wood, then created the "rainbow" by trying to just glop it down in round lumps. It's a little tricky - you don't want to squish it, but you have to work it in enough that it all holds together. And it needed lots of drying time - I'd touch the top layer which would feel dry, then press harder and a whole chunk would shift!  Then it was just layers of paint, and a layer of wax.  The letters are stamped onto tissue paper, laid on the top layer of wax, then heated with a heat gun enough for the wax to absorb the paper.  If any of you have any other questions, please just e-mail - I love sharing techniques with people...

Tuesday, June 12, 2012

Texture Love....

I bought a piece of decorative old tin some time ago, not sure what I'd do with it, but I loved it. Then recently I ran across it again, so I decided to do something with it before it descended into the depths of my rarely seen stash again...  After significant pondering, I finally decided on a way to start the piece, often the hardest part for me... Once I get going instinct tends to take over...This is the one I was whining about having to actually WAIT DAYS for it to dry, a couple of weeks ago - patience is not one of my virtues!  


This is one of the bigger pieces I've done, and I did enjoy working on the larger size (although, I didn't have to do anything to the middle, admittedly!)  I'm learning as I experiment more with it how much I enjoy playing with texture...


Just wanted to share, since I couldn't post pictures of my Summer of Color challenge piece yet - since it WASN'T DRY enough last night to finish and photograph... 


Friday, June 8, 2012

"Studio" Reorganization - yet again...

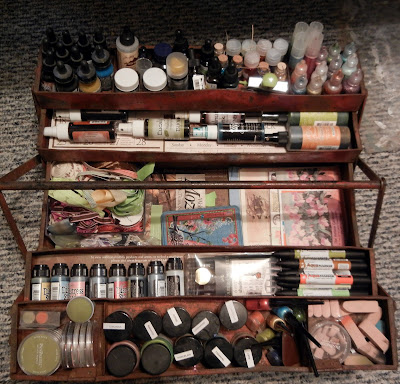
So, my "studio" is a corner of our guest room/office, but I try to make the most of this.  It requires constant reorganization as I acquire new things (hey, maybe if I just stopped doing that, huh?)... A couple of weeks ago I was at a vintage/antique show, where I got a couple of old, rusty tool/tackle boxes for a great deal at the end of the day.  They're meant for decoration, but I put them to work!  I love anything with lots of cubbies for organization, plus they're relatively portable.  So since I spent most of a day organizing and filling them last weekend and have no art to show for it, I thought I'd show them to you...


I love how this one opens up...


This fishing tackle box has great adjustable spots on top for things like brads and nails and tiny things....


And since I LOVE seeing other people's studios and art areas, and seeing how they organize things, I thought I'd include a few pictures of my "corner", since my camera was out.... Admit it, just looking at it is making you claustrophobic...


And finally, I just had to share a couple of pictures of this fabulous hat my boyfriend bought for me at a garage sale!


Sunday, June 3, 2012

Patience - Or Lack Thereof

I spent the morning working on a piece that has a relatively thick layer of joint compound - and then came to a screeching halt as I realized it was going to have to dry for a long time - like a WHOLE day... this kind of thing just kills me.... so to pacify myself I decided to try doing a watercolor directly onto one of the pages from my old pharmacy book. Instant gratification here I come!


It was really fun, and I love the old text showing through. I'll be doing more of these... Maybe this will be my standard "something to do while being forced to wait for shit to dry" project....


This is a journal page I did using Joanna from Fiddlesnips blended paper background and image transfer tutorial from a series she's doing on the Gauche Alchemy blog. I love the vintage, worn look it gives.


Horrible picture though - this journal is too fat and doesn't open flat, impossible to get a good scan.

Joanna has some other tutorials I want to try, and I still want to start working on Amy's Steve's Artfire free lessons as well.  Sigh... this day job thing really gets in the way...

Friday, June 1, 2012

Cracked Plaster Tutorial

In the All Together Now blog hop hosted by Amy, I gave away a cracked plaster on burlap piece (see a couple of posts ago), and some people expressed interest in learning more about how to do it.  Here are a couple of other pieces I've made using this technique.  (It's kind of hard to see the cracks on these unless you enlarge...)


Now let me say first, that I adapted this technique from Stephanie Lee, from her and Judy Wise's wonderful book Plaster Studio.  Stephanie also asked me to mention that they now have a Plaster Studio E-Book available on her website, which contains lots of videos of them working with plaster, which I'm excited about checking out.


So I'm going to just give a quick overview of the way I do it, which is a little different than the way Stephanie does it. The difference is that I stop short of the edge of the canvas in an irregular way so that the burlap shows, and I wrap it around the side ( I love burlap!).  With Stephanie's way you don't see the burlap - so it's just a matter of personal preference.

Step 1:  Have your piece of burlap cut out, large enough that it can fold around the back of whatever size canvas you're using. Make sure you have something under it to protect your surface, a plastic garbage bag or something.  Mix up a batch of plaster, just simple plaster of paris that you can buy at Home Depot or pretty much any hardware store. I buy one that's in what looks like a cardboard milk carton, it's a good size.  Add water to it and mix it up til it's kind of soft frosting consistency - not soupy, but not peanut butter either.  Make more than you think you'll need, just in case.

Step 2: Scoop a bunch of the plaster onto your canvas and using a small trowel or  something like it, start spreading it around the area of your burlap that you want to cover, working it into the burlap really well so that the plaster really adheres. The more rough and uneven you apply it the more texture there will be, so if you want smooth texture you'll need to work pretty quickly so it's not already drying by the time you're trying to really smooth out the top surface. Make the plaster a little wetter in that case. I'm guessing a thickness of about 1/4", more and less in different areas, is how mine have ended up.

Step 3: Let it dry overnight.

Step 4: Get cracking!  Start bending and rolling your plaster covered burlap (inward), in alternate directions, until you're happy with the cracks. This part is fun... The more cracks, the more texture and color variation there will be.

Step 5: Now center your plaster area over your canvas as you want it, turn it over, and start stapling the burlap to your canvas with a staple gun.  This goes quickly and is easier than it may sound, the only tricky part is the corners - trim away as much excess as you can, fold over very tightly and put quite a few staples in.  Trim away all excess.

Step 6:  Paint.  I don't think there's anything more fun to paint than cracked plaster. It's all about the layers.  Brush a layer of paint over the plaster, making sure it seeps into the cracks, then start rubbing it off with a paper towel or rag so that most (not all) of the color is in the cracks, more in some areas than others.   Then just repeat this process till you're happy, with different colors. Paint on, rub off....And as you rub, it starts developing a beautiful sheen.

Step 7:  Decorate. Here's where you let your style shine through. I try to not have too much going on, you don't want to compete with the beautiful cracks and paint too much. You might find that as you work little tiny loose pieces of plaster may come off, leaving a white bit.  Just dab a little paint into the area and wipe off. You can seal the piece with a matte or glossy sealant before you start embellishing, if you'd like.

Not sure how "quick" that overview was, but I hope some of you give it a try - I think you'll really enjoy it.  Please feel free to let me know if you have any questions!